
 Chitika Inc. (pronounced
CHIH-tih-ka) is a search-targeted advertising company. It is located in
Westborough, Massachusetts, USA. The name Chitika means "in a snap" in Telugu language.Primarily Chitika is a non-contextual advertising
company. In contextual advertising, the publisher script filters
the website for keywords and returns advertisements based on those
keywords. It can be use with Google Adsense, that’s great for your website.
Chitika Inc. (pronounced
CHIH-tih-ka) is a search-targeted advertising company. It is located in
Westborough, Massachusetts, USA. The name Chitika means "in a snap" in Telugu language.Primarily Chitika is a non-contextual advertising
company. In contextual advertising, the publisher script filters
the website for keywords and returns advertisements based on those
keywords. It can be use with Google Adsense, that’s great for your website.Overview:
Chitika is
very good for many websites where Adsense results are poor. For example,
Chitika can show relevant ads for a site with very few text and lot of
video content. Likewise, local sites especially do well with Chitika ads than Adsense.
This is because Chitika scans the search strings that they used to reach the
website.
How Much Will You Earn with Chitika?
The
potential earnings with Chitika may vary based on several factors:
- Which advertisers appear on your site: Chitika’s technology is designed to serve each individual user with the most relevant and engaging ad based on each impression. The rates advertisers pay for a given ad, which directly impacts that ad’s CPM, increases or decreases depending on the ad topic (keyword), and competition within that industry for online ad exposure. For example, finance-related ads typically demonstrate higher CPMs compared to those for consumer packaged goods, as seen in the most recent edition of their Ad Monetization Matrix.
- Geographic location of your website traffic: While Chitika serves ads worldwide, advertisers generally pay more for U.S. and Canadian Web traffic, which correspondingly increases the publisher payout on those impressions. Beyond that, users browsing from English-speaking nations will also yield higher CPMs than traffic from non-English speaking countries.
- The Chitika ad types you use, and where you place them on your site: Chitika has a variety of ad unit types that vary in size and user experience. The placement and size of the ad unit typically impacts earnings. Publishers who choose to combine certain Chitika ad types, like the Chitika Hover app, with search-targeted ads, often see an increase in earnings.
Quick Guide:
Step 1: First you need to join Chitika. Just click on the ‘Start
Now’ button below the post. Then click on publisher tab and enter your email
then go. They will send you an application form in your email id. Fill up the
form entering your website or blog URL and submit your application.
Step 2: Then they will review your application. After approval
from Chitika, you get a publisher account. Log in to your account with user id
and password.
Step 3: After log in to your account you will be on your
dashboard. Click on Ad Setup to create your ad style and then get the HTML code
and copy it.
Step 4: Customize the look and feel of the ad for better
clicking performance.
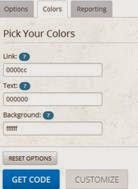
- Choose the colors for how you want your ad to look. You should choose colors that blend in or compliment your website for the best performance.
- Choose the size and format of the ad unit.
- If you wish to keep track of how your ad unit is performing you will need to create a channel by adding it to the "Channel" field.
- Click "Get Code" and copy and paste it into your website.
Wordpress:
- Login to your WordPress admin panel, select “Plugins.”
- Select “Installed Plugins.”
- From your list of plugins, scroll to the newly added
“Chitika” plugin. Click where it says “activate” to the left under the Plugin
name.

- After activating, your will be brought to the Chitika plugin settings. To get started, first add your Chitika account username.
- After adding your Chitika username, you are ready to start customizing the ad units. Once you select the ad placement, you can choose from over 20 different ad unit sizes, colors, and colors. Hit “save settings” and your Chitika ads will be up and running.
- Log into your Blogger account.
- Once logged in you will need to click on "Layout"
- Next you will need to decide where you would like to run Chitika ads on your Blogger site.
- When you have the desired location you will need to click on "Add a Gadget". You will then need to click on HTML/JavaScript to add JavaScript code to your site.
- This will bring up a new window that you can copy and
paste the ad code you have generated from the publisher panel into the
"Content section." Once you have the code in this window you will
need to click save.

- Next you will need to click "Save Arrangement" and you are ready to start earning with Chitika ads.

- Log into your Weebly account.
- Click on the title of your blog or click "Edit"
- Scroll down on the side bar until you see "Embed Code"
- Click and drag the box into the edit area.
- In this window click on "Edit Custom HTML" then copy and paste the ad code you have generated from the publisher panel into the text box. Once the code is placed click anywhere out of the box.
- Now you have functioning Chitika ad code on your Weebly page!

Payout : Min Payout $10 via paypal or bank wire
